I own three non-sports bras, and they all seem to be ill-fitting. I just can't figure out how to buy bras that fit for more than a month or two. Most recently, my problem has been that all my bras ride up my boobs irritatingly, all throughout the day.
The problem? My band sizes are all too big!
It blew my mind when my friend informed me that that was the problem. I had thought it was the straps - even though the straps were nice and snug, so evidence showed that that clearly wasn't the issue.
So I figured, why not try decreasing the band size myself? I would normally buy new bras at this point - so if I fail during the process, it won't be too big of a loss. (At least, that's how I thought about it.)
Now, I'm going to preface the process by saying that I am not a master seamstress. I'm sure you could make this project even better by flattening the new seams you create, but I didn't want to bother.
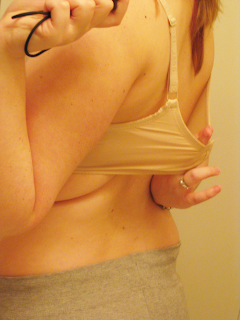
This is what I was starting with. As you can hopefully see (it's quite hard to take a picture like this of yourself!), there are SEVERAL inches of space between my back and the band when I stretch it out. Case in point: my bra was way too loose.
I decided to tighten the band by cutting it, then resewing it tighter. For a bra that clips in the back, you want to do this twice, and be symmetrical on each side - otherwise, the straps and everything will be off-center. I chose the area between the cup and the strap to cut, because it has the most space to work with.
This is the area I'm talking about. I'm going to fold it in half - "wrong" (inside of the bra) sides together - on the imaginary line where the pencil is right now.
Just based on how loose the fit was, I was guessing that I could probably take off 3-4 inches. However, I decided to play it safe and start with around an inch taken off each side.
After folding the bra over, I pinned the fabric. I needed to do it a medium distance away from the fold, because remember, I'm cutting some of the band out.
I'm ready to cut the fabric, but first, I need to figure out where to cut. Since I want to cut an inch off, I measured half an inch away from the fold.
I sketched a small line at the zero mark, then chopped the fabric off.
I went with the smallest seam allowance I'm comfortable with - which is pretty big when I'm using a zigzag stitch, because it gives me trouble sometimes. :p
Not the cleanest seam ever, but honestly, this is probably the best zigzag stitch I've ever managed.
There's a lot of extra fabric, though. I thought about flattening the seam and sewing the edges down, but I didn't want to bother. Instead, I just cut the extra fabric off.
Do this on the other side of the bra, too.
Now try it on! If it's still too big, repeat the process until it's a size you like. Mine feel nice and snug now.
I'm not too worried about the seams, even though I often like wearing tight shirts. I mean, if you're worrying about that seam, are you also worrying about all the hooks and straps and underwire in the rest of the bra? Besides, if anybody's looking at you closely enough to see the seam - they're too close. ;)
Hopefully, this helps you extend the lives of your bras a little bit, instead of having to always buy new ones like I used to!
Decorative font in featured image is Please Write Me a Sing.


No comments:
Post a Comment